I love all of the costumes from Saiunkoku Monogatari and Shunki was on my cosplay wishlist for a little while. I had the intentions of making her for a winter convention in early 2014 but I only started in the spring of 2014. I worked on it on and off for almost a year and I finally got to debut it at Katsucon 2015!
Construction:
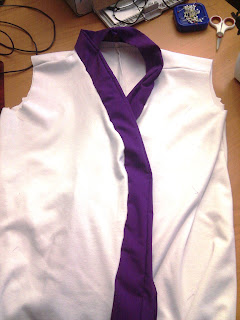
Tunic - The tunic was made by modifying and combining two different patterns, one for the body of the tunic and one for the sleeve. I used Simplicity's 5840 view D for the body. I modified the neckline of the body so that the tunic crossed over until my bust line then went straight down to my waist instead of it crossing over the entire way down to my waist line. The collar that runs along the neckline was reinforced with interfacing and pleated every few inches to give it a more "wavy" shape.
 |
Tunic Construction
The sleeves were made using McCall's M4491 view D pattern (It is not being printed anymore). They are fully lined. The sleeve hole was adjusted before cutting the fabric out so that attaching the sleeves wouldn't be a hassle and a half. To help keep the shape of the neckline I added some snaps and velcro to act as closures. The tunic is put on first and to help it stay closed I tie a white cord around my waist.
 |
| Pleating the collar |
|
Under Skirt - The skirt was made from the same white ponti di roma material as the tunic. I lay down my fabric and drew a half circle in chalk. I then drew in the waist line and cut out the skirt (one layer only). The back seam was sewn, then the elastic waistband was attached and finally the hem was finished with a blind hem stitch. The skirt if put on second over the tunic. Once the skirt and tunic are in place the cord used earlier is removed.
 |
Measuring the hem
|
Sleeveless Tunic - The sleeveless tunic used the same pattern for the body as the regular tunic. Instead of adding sleeves, a purple bias was sewn along the armhole edges and the opening. It is partially lined and made of white ponti di roma material with purple poplin as the bias trim.
 |
| Adding the purple trim |
Over Skirt - The over skirt was made using a full circle skirt with an elastic waistband. The fabric was of an unknown fiber content, though I suspect it was a polyester based fabric. The fabric itself was very heavy and the skirt weighs at least five pounds. I had to shorten it a bit to take off some of the weight from around my waist since the elastic wasn't able to hold it up.
 |
| Hemming the main skirt |
Obi - The obi was made from a light purple fabric that had an interesting texture to it. There was a slight stretch to it. Since I was going to wear a robe over the whole costume, I decided not to make a full obi and only make it long enough to fasten up in the back with Velcro. I used a heavy interfacing which, in hindsight did not work out very well with my fabric choice. The obi is too stiff but it works just the same. I used a yellow-gold cord for the obijime.
 |
| Cutting the obi fabric |
Robe - The robe was made using a pattern and modifying the opening and the sleeves. I used the Simplicity pattern 5840, view B. The pattern called for a hood and a closure near the neck which did not fit with Shunki so I ignored the hood and straightened out the neckline so that it was one smooth line. The sleeves were not full enough to fit the tunic sleeves so I added some triangular inserts in the seam to try and expand them a bit. The clasp was made using a red tassle, red embroidery floss and a red ribbon. It was improvised a bit and I played around until the clasp part worked for me.
 |
| Sleeves |
Wig - Shunki's wig required a lot of thought and planning before the construction process actually started. I first needed to determine which wig I would use as a base wig, I knew I needed to use a high quality wig so I looked through the colours that arda wig offered and I found the perfect dark purple. They also sell a wefts in many different colours. I settled on a wig style that had bangs almost as long as the rest of the wig. I placed the wig carefully on a wig head, pinned it in place and combed it out. I pulled back the bangs and tied them into a ponytail. Since the wig was not meant to be pulled back, I had to make a glued front hairline. I used this
tutorial as a guide!
 |
| Unstyled wig |
 |
| Hair pulled back |
 |
| Adding the wefts |
 |
| Finished wefts |
It took me four layers of the purple wefts to get the thickness of the hairline to what I wanted it to be. The sparse and random "bangs" were added after the hairline was cut. They were glued down flat over the top of the wig with the weft pointing towards the bun. The bun was made using only the hair from the wig and the wefts glued on. There was no need to add a foam core as the hair was thick enough to form a nice solid bun. The accessories around the bun were glued in place and made from painted craftfoam and fake roses. I used one of my personal hairpins for hers. The little wooden hair bobbles were glued into place. The hair tie at the bottom of the wig was made using jewelry wire, bias trim and a large barrette. The wig is held secure on my head using body tape that I purchased from La Vie En Rose.
 |
| Hair accessories |
 |
| Completed wig |
Shoes - I bought a pair of burgundy slipper shoes at Ardenes for $3 due to a crazy sale they had the day I walked in. It took a long time to find shoes that matched the colours of the costume since flats were not in season when I was finishing this costume.
 |
| Completed Costume |


