Tuesday, 11 August 2015

Nadeshicon and Ottawa Comic Con 2015 Journal

Bandit Spurs, Stardustdrive from Tsuki no Stardust and I decided to go on a little adventure to Nadeshicon for one day.  We got to the con just before midday and were the last ones to get into the masquerade.  Bandits wore her Maiden Zelda, Stardust wore his Youko Kurama and I wore my Shunki cosplay.  We spent some time taking photos of each other outside and then photographer other cosplayers in the area.  We wandered around the dealer's room for a bit and then spent the rest of our time in the green room.  We had quite a bit of fun and got to meet new people which is always great.  Our performances went decently well but none of us know if we placed in our respective classes.  The day ended with us grabbing dinner together before heading out on our journey back to Montreal.

Bandit Spurs as Maiden Zelda
Stardust as Youko Kurama


Myself as Shunki
Ottawa Comic Con was also a one day event that I decided to attend.  Bandit Spurs, Corey, his friend Tim and I drove out for the Saturday.  Both Bandits and I were testing out our newest costumes, hers being Queen Zelda and mine being Pocahontas.  It was a good thing we didn't enter the masquerade because She still needed to do some painting and one of my zippers broke!  We met up with Annie before she had to go to the green room and we all got photos taken by Cosplayers Canada who was offering some free shoots.  Later on we sat in on the masquerade to watch Annie and the show was relatively quick.  All in all, it was a nice day to walk around in costume and take in all the sights!

Anniechie as Esmerelda and myself as Pocahontas

Katsucon 2015 Journal

So many amazing costumes!!!  I can't even!!  This was my first ever Katsucon and my third US convention that I attended.  It was a really big endeavour with all the driving and the sheer cost of it.  Katsucon is not a cheap con to attend so keep that in mind if you are planning to go to it in the future!   Corey and I traveled with a photographer that I had met at Otakuthon 2014 (henrickson) and his friend.  We left Montreal late Wednesday night with my van and drove straight to National Harbour with a couple of hour long breaks to stretch our legs and eat.

We arrived in National Harbour on Thursday in the afternoon.  We checked into our hotel, brought all our luggage up to the room and went ahead with out business. Thursday night was spent walking around the convention hall and figuring out where all the events were happening.  Henry took some photos of con goers, myself included.

Howl taken by Henrickson
Friday came around and I started the day by wearing my Shunki costume.  It was my first time wearing the completed wig so I was a little concerned that it would fall off my head during the day.  Corey and I spent most of the day wandering around the con and taking photos of people.  We spent some time in the artist alley and the dealers room.  Later on during the day I went to enter my Shunki costume in the Hall Cosplay Contest.  While I was waiting to get judged, we met some Fate/Stay Night cosplayers.  They invited us to a room party where we met a bunch of other cosplayers.  It was my first time actually meeting and hanging out with new people at a con so it was a really great experience!

Meeting Kamui as Shunki 
Saturday started bright and early at the Clamp gathering.  I went in my Sakura Hime cosplay and I managed to get some really nice photos with a Syaoran and a Faye :D  I also got a polaroid photo taken of me!  I entered my costume in the Hall Costume contest for the Saturday and while waiting to get judged we met up with the same people that we hung out with the previous night!  The masquerade was the big event that night and some of the skits were freaking elaborate with all the set pieces and props.  After getting changed out of costume, we went out to dinner with our new friends.

Clamp gathering as Sakura Hime
Sunday was spent wandering the halls and taking photos of cosplayers.  I was dressed as Yukari from the anime Another, my first ever school girl cosplay!  Some of our new friends had a photo shoot for their Chobits cosplays and I suggested a few poses for them, which turned out beautifully!  Eventually we all had to say our farewells.  We weren't leaving util Monday morning so our hotel group went to get dinner before chilling by the gazebo for the rest of the evening.  The trip back home was long and exhausting but we all felt great about our experience.  I would totally do it again (though maybe with less driving)!

Sakuragi Yukari taken by Corey Clayton

Friday, 19 June 2015

Sakuragi Yukari

Yukari was an unexpected, spur of the moment cosplay decision.  One of my cosplay friends had a few cosplays for sale and as usual I was browsing through them.  This one was for sale and the sizes all fit me so I purchased it off of her.  I like to support fellow cosplayers and this costume could also be used for other characters from the series since it's a school girl uniform.

The costume itself was a closet cosplay and consisted of a plain white shirt, a black blazer that had be modified to match the school blazer, a navy pleated skirt, a pair of glasses, a red bowtie, a short brown wig and an orange hairbow.  I do have to make some changes to this costume since I accidentally shrunk the skirt in the wash and now it no longer fits me xD Guess I need to make a new one!  Another added bonus is that the base of this outfit is the same as the high school girl outfits from Digimon Tri!  Maybe I'll cosplay Mimi one day :)

Completed Costume

Friday, 12 June 2015

Sa Shunki

I love all of the costumes from Saiunkoku Monogatari and Shunki was on my cosplay wishlist for a little while.  I had the intentions of making her for a winter convention in early 2014 but I only started in the spring of 2014.  I worked on it on and off for almost a year and I finally got to debut it at Katsucon 2015!

Construction:

Tunic - The tunic was made by modifying and combining two different patterns, one for the body of the tunic and one for the sleeve.  I used Simplicity's 5840 view D for the body.  I modified the neckline of the body so that the tunic crossed over until my bust line then went straight down to my waist instead of it crossing over the entire way down to my waist line.  The collar that runs along the neckline was reinforced with interfacing and pleated every few inches to give it a more "wavy" shape.
Tunic Construction

The sleeves were made using McCall's M4491 view D pattern (It is not being printed anymore).  They are fully lined.  The sleeve hole was adjusted before cutting the fabric out so that attaching the sleeves wouldn't be a hassle and a half.  To help keep the shape of the neckline I added some snaps and velcro to act as closures.  The tunic is put on first and to help it stay closed I tie a white cord around my waist.

Pleating the collar
Under Skirt - The skirt was made from the same white ponti di roma material as the tunic.  I lay down my fabric and drew a half circle in chalk.  I then drew in the waist line and cut out the skirt (one layer only).  The back seam was sewn, then the elastic waistband was attached and finally the hem was finished with a blind hem stitch.  The skirt if put on second over the tunic.  Once the skirt and tunic are in place the cord used earlier is removed.

Measuring the hem

Sleeveless Tunic - The sleeveless tunic used the same pattern for the body as the regular tunic.  Instead of adding sleeves, a purple bias was sewn along the armhole edges and the opening. It is partially lined and made of white ponti di roma material with purple poplin as the bias trim.
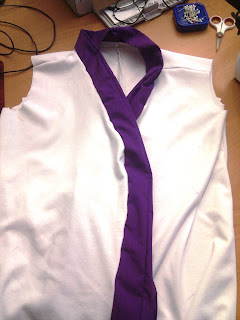
Adding the purple trim
Over Skirt - The over skirt was made using a full circle skirt with an elastic waistband.  The fabric was of an unknown fiber content, though I suspect it was a polyester based fabric.  The fabric itself was very heavy and the skirt weighs at least five pounds.  I had to shorten it a bit to take off some of the weight from around my waist since the elastic wasn't able to hold it up.

Hemming the main skirt
Obi - The obi was made from a light purple fabric that had an interesting texture to it.  There was a slight stretch to it.  Since I was going to wear a robe over the whole costume, I decided not to make a full obi and only make it long enough to fasten up in the back with Velcro.  I used a heavy interfacing which, in hindsight did not work out very well with my fabric choice.  The obi is too stiff but it works just the same.  I used a yellow-gold cord for the obijime.

Cutting the obi fabric
Robe - The robe was made using a pattern and modifying the opening and the sleeves.  I used the Simplicity pattern 5840, view B.  The pattern called for a hood and a closure near the neck which did not fit with Shunki so I ignored the hood and straightened out the neckline so that it was one smooth line.  The sleeves were not full enough to fit the tunic sleeves so I added some triangular inserts in the seam to try and expand them a bit.  The clasp was made using a red tassle, red embroidery floss and a red ribbon.  It was improvised a bit and I played around until the clasp part worked for me.

Sleeves
Wig - Shunki's wig required a lot of thought and planning before the construction process actually started.  I first needed to determine which wig I would use as a base wig,  I knew I needed to use a high quality wig so I looked through the colours that arda wig offered and I found the perfect dark purple.  They also sell a wefts in many different colours.  I settled on a wig style that had bangs almost as long as the rest of the wig.  I placed the wig carefully on a wig head, pinned it in place and combed it out.  I pulled back the bangs and tied them into a ponytail.  Since the wig was not meant to be pulled back, I had to make a glued front hairline.  I used this tutorial as a guide!

Unstyled wig
Hair pulled back
           

Adding the wefts
Finished wefts
       
It took me four layers of the purple wefts to get the thickness of the hairline to what I wanted it to be.  The sparse and random "bangs" were added after the hairline was cut.  They were glued down flat over the top of the wig with the weft pointing towards the bun.  The bun was made using only the hair from the wig and the wefts glued on.  There was no need to add a foam core as the hair was thick enough to form a nice solid bun.  The accessories around the bun were glued in place and made from painted craftfoam and fake roses.  I used one of my personal hairpins for hers.  The little wooden hair bobbles were glued into place.  The hair tie at the bottom of the wig was made using jewelry wire, bias trim and a large barrette.  The wig is held secure on my head using body tape that I purchased from La Vie En Rose.

Hair accessories
Completed wig
                   
Shoes - I bought a pair of burgundy slipper shoes at Ardenes for $3 due to a crazy sale they had the day I walked in.  It took a long time to find shoes that matched the colours of the costume since flats were not in season when I was finishing this costume.

Completed Costume

Tuesday, 2 June 2015

Frostcon 2015 Journal

Frostcon was not on my original list of cons to go to but once I won two free passes I figured that it would give me an excuse to visit some of my friends in Toronto.  As day started getting closer, my friend Locobu approached me about doing a cosplay group together.  We decided on doing Sophie (her) and Howl (me).  One of her other friends (Megan) eventually joined us as the Witch of the Waste!  This group gave me even more reason to go!  In the end, I was never able to arrange a visit with my Toronto friends so I decided to make Frostcon a crazy one day thing!  I got my boyfriend and myself on a night bus from Montreal to Toronto, got to the con SUPER early, and left Toronto on another night bus.  Needless to say it was a crazy day!

There was a lot of really great cosplay at this small con, in fact I would say the convention was catered to cosplay.  I was actually on a cosplay panel for the first time ever!  I had no idea what to expect.  I was supposed to give the panel with two of the cosplay guests.  Only one of them ended up showing up (the other one was feeling ill).  As it turned out, we didn't have a projector or a screen so the power point we prepared was not used to the fullest potential.  I personally felt that she had included too many notes in her slide show but in hind sight it's best to have too many than not enough.  I didn't get to talk very much which was fine with me.  It was my first one and I figured I would mostly observe to see how it was like on the other side of the table.

Most of the day was spent wandering the con with my Howl's Moving Castle Group.  We attended one of the guest performances and then had to rush along to practice our skit for the masquerade.  This was my first time doing a skit and having to say words in time with the audio track on stage so it was a bit of a challenge for me!  I think it turned out well though.  You can check out the skit here!  We were the first to perform since I had a bus to catch and I wasn't sure if I was going to be able to stay for the entire masquerade.

Our skit ended up winning the Best in Class Artisan Division award which was cool!  Right before leaving I was able to grab some photos with my group and Locobu and I even ended up being in a fan video, which you can find here!  Overall, it was really fun and totally worth losing one night's of sleep due to traveling!  Will I do it again?  Probably not, it was a once in a lifetime experience.  Next time I go, I will get a hotel room!

Sunday, 8 March 2015

Howl

This was a sort of last minute cosplay plan (and when I mean last minute cosplay plan, it was decided two months on advance of the con).  My friend Locobu and I were going to attend Frostcon in Toronto and we decided that we should get together a group cosplay.  We were debating on different pairings when one of her friends said that she was going to cosplay the Witch of the Waste which led us to choose a Howl (me) and Sophie (Locobu) pairing.  It was great fun to be a fabulous wizard for a day!

Construction:

Shirt - Howl's shirt is really large and billowy about him so I decided to use a men's medium sized pattern to make the shirt.  I chose to use Butterick's B4574 pattern.  I used a white poly cotton material that I got for a super cheap price.  I followed the pattern instructions all the way to the last sleeve step.  Instead of adding an elastic cuff, I added an interfaced cuff using this tutorial here.  The cuffs are kept closed by large hooks and eyes.  I also added a ruffle on the blouse following the edge of the interfacing on the inside of the shirt.  The ruffles was finished by sewing a white ribbon over the top to keep it from fraying.

Adding the collar
Jacket - Having never made a jacket before I started off by looking through my patterns to work off of. I took Simplicity's 5840 view B as a base for the jacket.  I modified the robe pattern so that I would have a shoulder seam rather than a yoke seam along the front and back.  I also adjusted the length of the pattern so that it ended at around my hip level.  Then I added a collar to the pattern and modified the sleeve to have a false cuff on the outer layer.

Base of jacket
The main body of the jacket was made from a pink fabric of unknown fibers and grey polyester fabric.  I hand sewed each grey diamond applique using a slip stitch.  I figured that I would got for a quilting type of applique because I didn't want my stitches to be obvious (such as satin stitching).  The applique took the majority of the time constructing the jacket.  I had to sew over twenty individual diamonds!  The end look was totally worth it though.  The sleeves were constructed with the same pink fabric, a white poplin and a yellow poplin.  The yellow "trim" was treated as a sewn in stripe for the sleeve.

Adding the applique
The lining was made from a red stretch material and it was attached to the jacket before the collar was attached.  The neckline was left open on the jacket.  The collar was also lined with the bottom seam left open to match the jacket.  The collar was sewn to the jacket matching the outside layers together, then pressed and slip stitched closed on the lining side.  The yellow bias along the collar and opening of the jacket was sewn on last.

Lining
Pants - I was lazy and bought the pants.  Unfortunately the zipper doesn't work so well so I had to sew a Velcro strip in the front to keep it from opening up.  They are so comfy though!

Boots - These were also bought.  At first I thought they were super comfy but I realized that after wearing them for a day that my feet would start hurting.  I guess I might have to invest in an insole for those boots.  They were so perfect for the character though, I just had to get them!

Boots and pants
Jewel - It just so happened that I owned a blue jewel necklace for the longest time and I never wore it.  I kept it for some reason and it eventually ended up being the best jewel for Howl!

Wig - I used Arda Wigs' Inigo in light blonde for Howl.  It had some weird curls at the bottom of the wig so I decided to try the hot water method for straightening a wig.  It worked great and my wig is pretty straight now!  I messed up with cutting the bangs because for some reason it looked straight on my wig head but when I would try it on the bangs were never straight.  I eventually had to finish the bangs while wearing the wig.

Cutting the bangs
Completed costume (I forgot the jewel!)

Thursday, 5 March 2015

Sakura Hime - Tsubasa Shunraiki

I love the story of Tsubasa and I love the character designs. Sakura Hime has so many different outfits it was so hard to choose the first one to cosplay!  I decided on her Nihon kimono from the Shunraiki OVA.  I love the simplicity of the design and the colours!  It isn't a well known or often cosplayed outfit so I wanted to share some love for it.

Construction:

Tunic - The tunic was made by modifying and combining two different patterns, one for the body of the tunic and one for the sleeve.  I used Simplicity's 5840 view D for the body.  I modified the neckline of the body so that the tunic crossed over until my bust line then went straight down to my waist instead of it crossing over the entire way down to my waist line.  The collar that runs along the neckline was reinforced with interfacing and pleated every few inches to give it a more "wavy" shape.
Tunic Construction
The sleeves were made using McCall's M4491 view D pattern (It is not being printed anymore).  They are fully lined.  The sleeve hole was adjusted before cutting the fabric out so that attaching the sleeves wouldn't be a hassle and a half.  To help keep the shape of the neckline I added some snaps and velcro to act as closures.  The tunic is put on first and to help it stay closed I tie a white cord around my waist.

Pleating the collar
Under skirt - The skirt was made from the same white ponti di roma material as the tunic.  I lay down my fabric and drew a half circle in chalk.  I then drew in the waist line and cut out the skirt (one layer only).  The back seam was sewn, then the elastic waistband was attached and finally the hem was finished with a blind hem stitch.  The skirt if put on second over the tunic.  Once the skirt and tunic are in place the cord used earlier is removed.

Measuring the hem
Kimono - I used McCall's M4953 kimono pattern as the base for Sakuras.  Since her kimono is sleeveless I only took the body portion of the pattern and modified it to have the special curvature of the hem.  The appliques were added after the kimono was pieced together but before the lining was put together.  They were made from a pink satin and were bonded to the fabric using Heat'n'Bond.  I only later realized that you can't iron satin on the right side...   Once the appliques were fused to the fabric, they were stitched in place using a satin stitch.  I used a flattened out coffee filter as reinforcement for my stitches.  I learned the hard way that the Heat'n'Bond glue sticks to the needle and this causes a lot of threads to break or the machine to skip stitches.  I was recommended to used fusible interfacing next time).

Satin stitches seen on the coffee filter
The kimono is completely lined and made out of a light purple fabric.  The fibers were unknown but I think they had a polyester base since that was the ironing temp that I ended up using :P  The edging along the neckline and sleeves was made using a purple poplin fabric.  The ruffle was made using a white satin and it was attached to the hem via a dark purple single fold bias tape.  To keep the kimono from moving around too much I take the white cord and tie it closed around my waist.  I keep it in place under my obi.

Attaching the ruffle
Obi - I wanted the obi for Sakura Hime to be an actual obit that I could tie and have a pretty bow in the back.  I used the measurements for a traditional Nagoya obi and tried to the best of my abilities to make it work when I only had one meter of fabric to work with.  The obi is reinforced with interfacing and lined with a semi rigid cotton.  The final product is slightly smaller than the traditional Nagoya obi should be and I personally feel that it isn't as stiff as it should be but it still works.  I fold it in half along the length and then tie it in a bow.  I pass a purple cord through the bow and tie it in front to keep it in place.

Sash - The sash was made with a white, gauzy curtain material.  It frayed really badly so I ended up having to fray check the entire thing!  Since the sheer width of the cut was huge (I would say between 2.5 - 3 m) I didn't have to piece anything together.  I just sewed it up along the sides and the top, leaving just enough room to turn it inside out.  I was lazy and I just sewed it shut with my machine rather than slip stitching it :P  The entire thing was pressed using the synthetic setting on my iron.

Wig - Instead of spending money and time on buying and styling a new wig, I just reused my Sakura Kinomoto wig from last summer.  Actually it was my intention to use it again :)  They are essentially the same character anyways so it works out.

Sakura wig
Shoes - I still have to find shoes that would match this character.... maybe over the summer I'll purchase some geta :P

Completed costume (photo by Cyberfox007)